ChatGPT workspace agents let you build agents for repeatable tasks and workflows in ChatGPT. You can create an agent, test it before publishing, choose its model and reasoning effort, connect it to apps and tools, share it with teammates or your workspace, use it in Slack, run it on a schedule, or trigger it through an API.
Workspace agents are off by default at launch for ChatGPT Enterprise workspaces, and admins can enable them for eligible workspaces. The same Workspace Agents role-based access controls apply in ChatGPT and in the Codex Workspace Agents plugin: users can only see and run agents they have permission to access. There is not a separate Codex-only toggle for this plugin; disabling Workspace Agents for a user or role also disables the Workspace Agents plugin in Codex for that user or role.
Browse and create workspace agents
You can access ChatGPT workspace agents by clicking on Agents on the left-hand sidebar.
In Agents, you can browse agents in these sections:
Recently used, which shows agents you have used recently
Built by me, which shows agents you created
Team directory, which shows agents created by your organization
Creating an agent from a template
You can create an agent from a template from the Agents page.
To create an agent from a template:
Open Agents.
Select Browse templates.
Select a template from the template window.
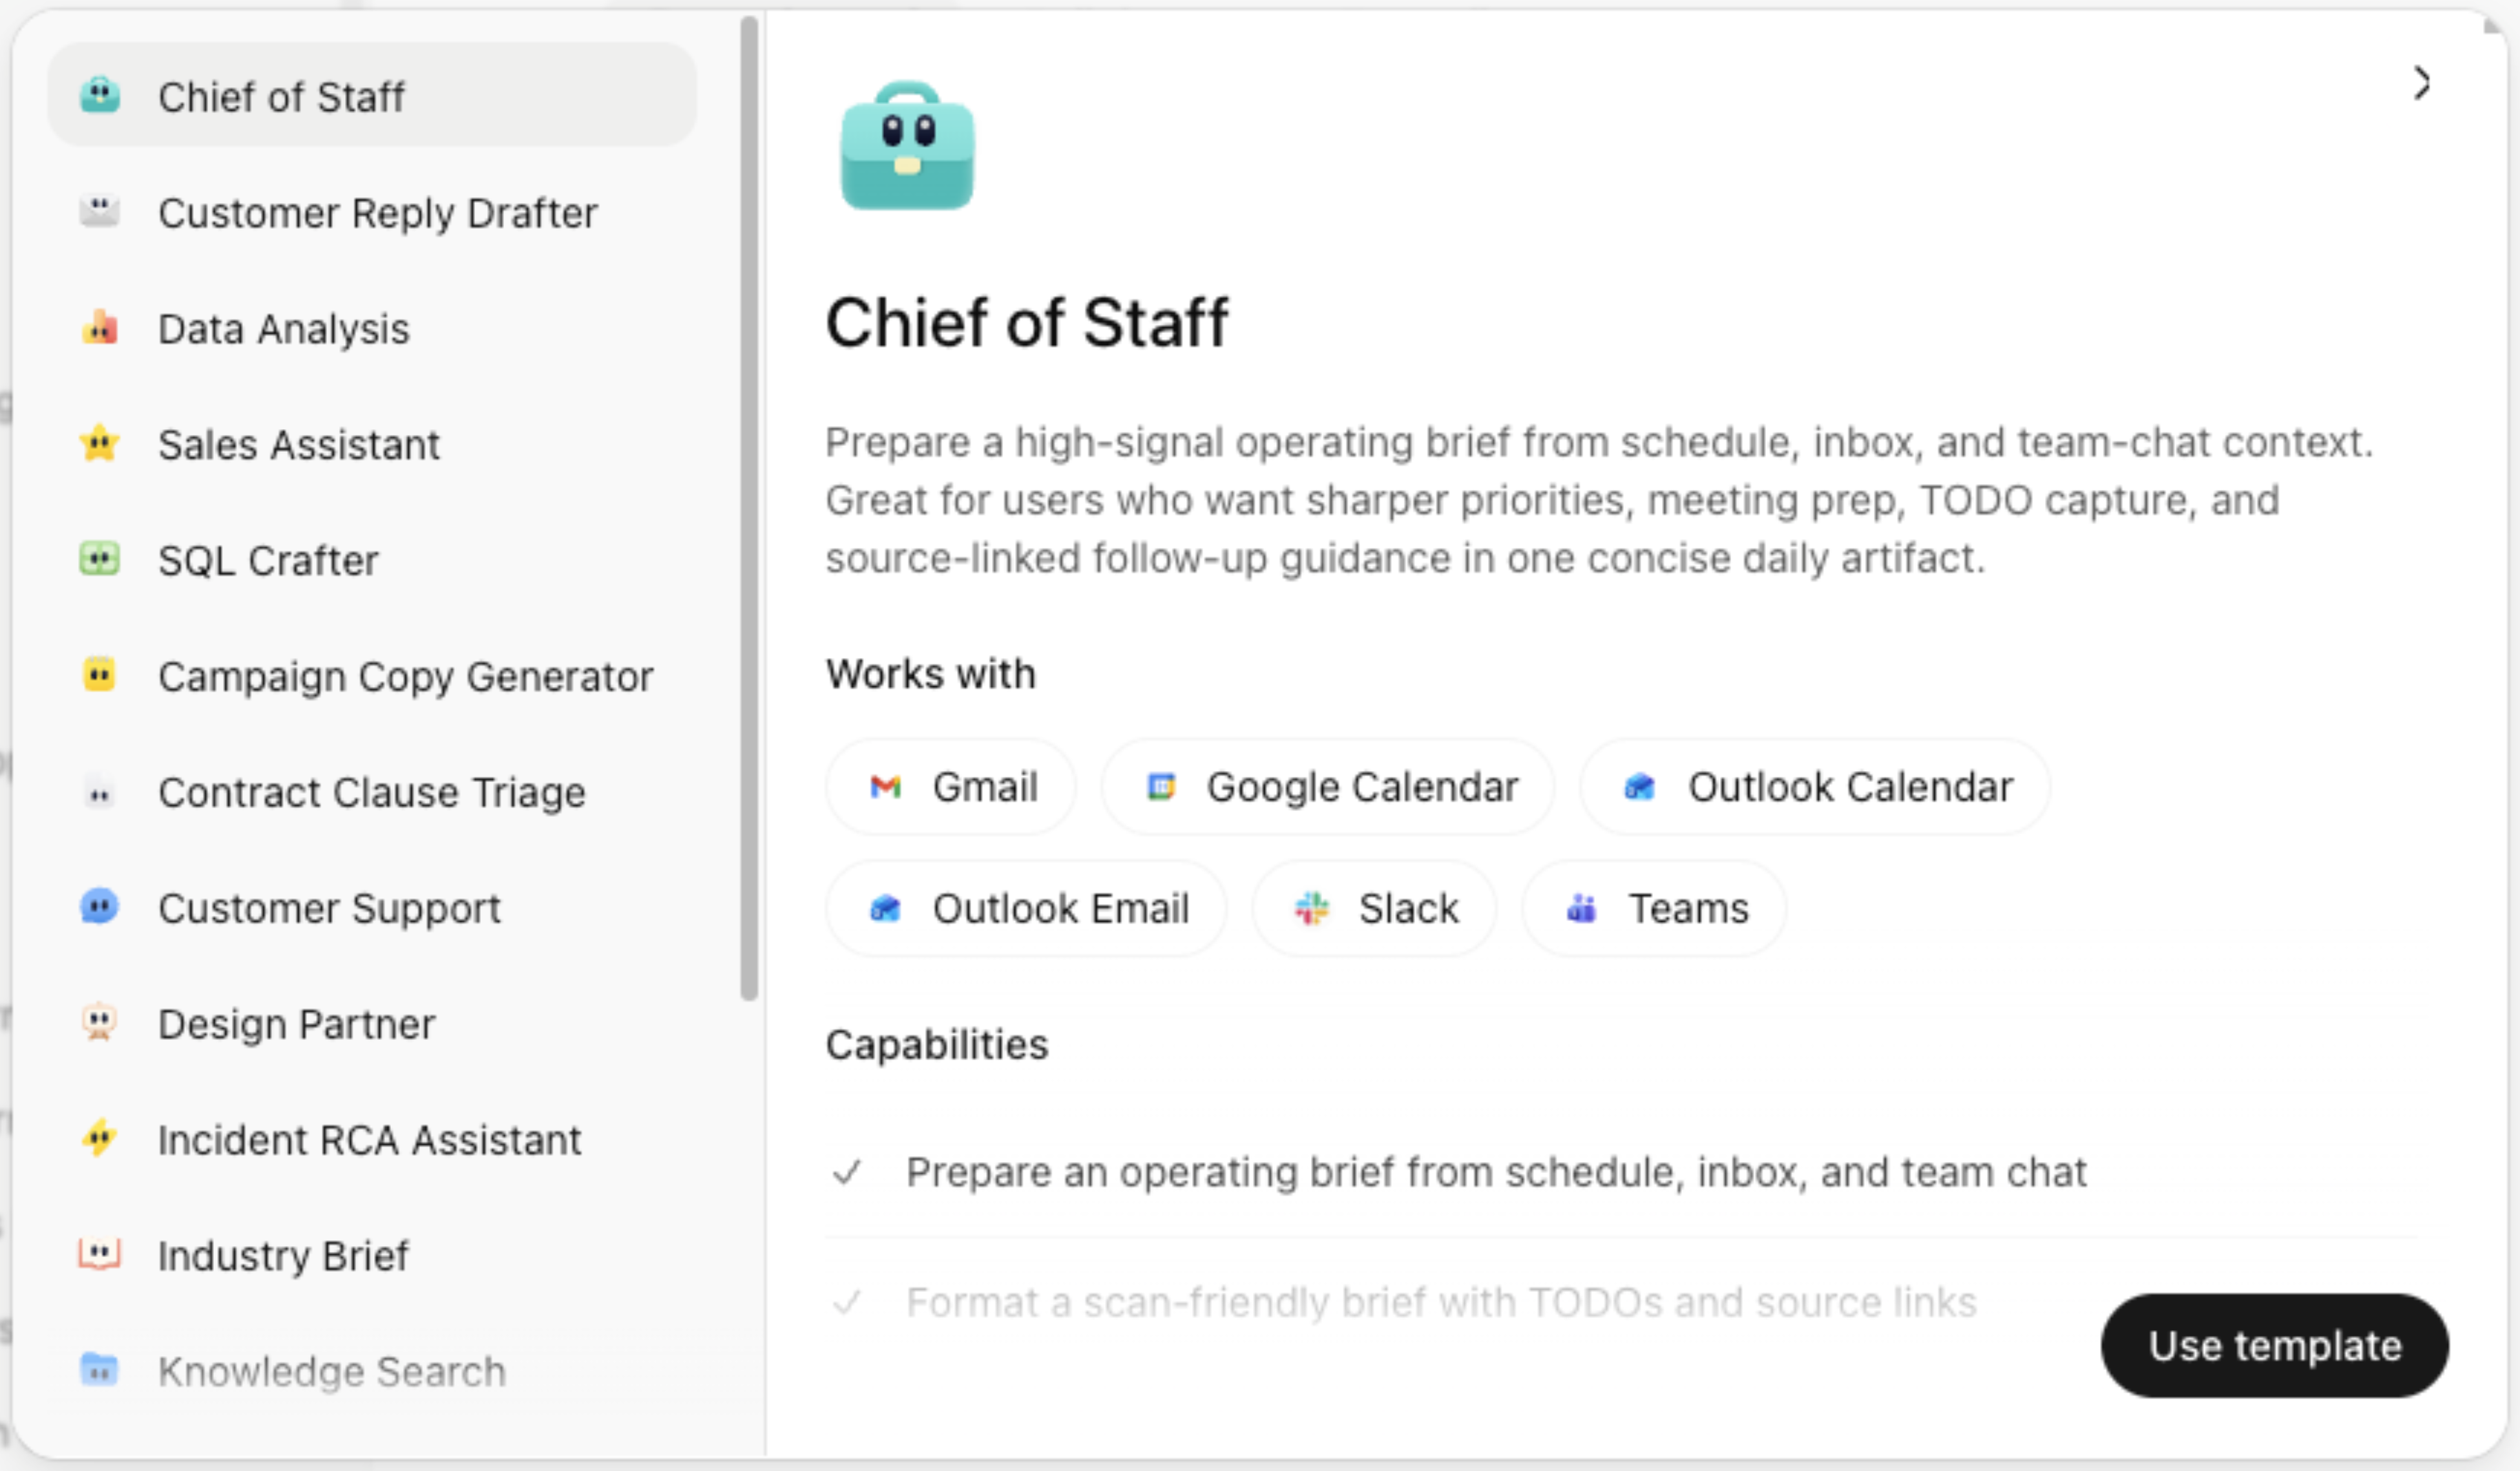
Select Use template.
Choose the tools you want to give the agent.
Select Create Agent.
In the builder, refine the agent as needed.
Select Create.
Creating an agent with the agent builder
You can also create an agent with the agent builder.
To create an agent:
Open Agents.
Select Create.
Enter a prompt describing what you want the agent to do, or select Start blank.
You can select Skip to builder at any time to start building.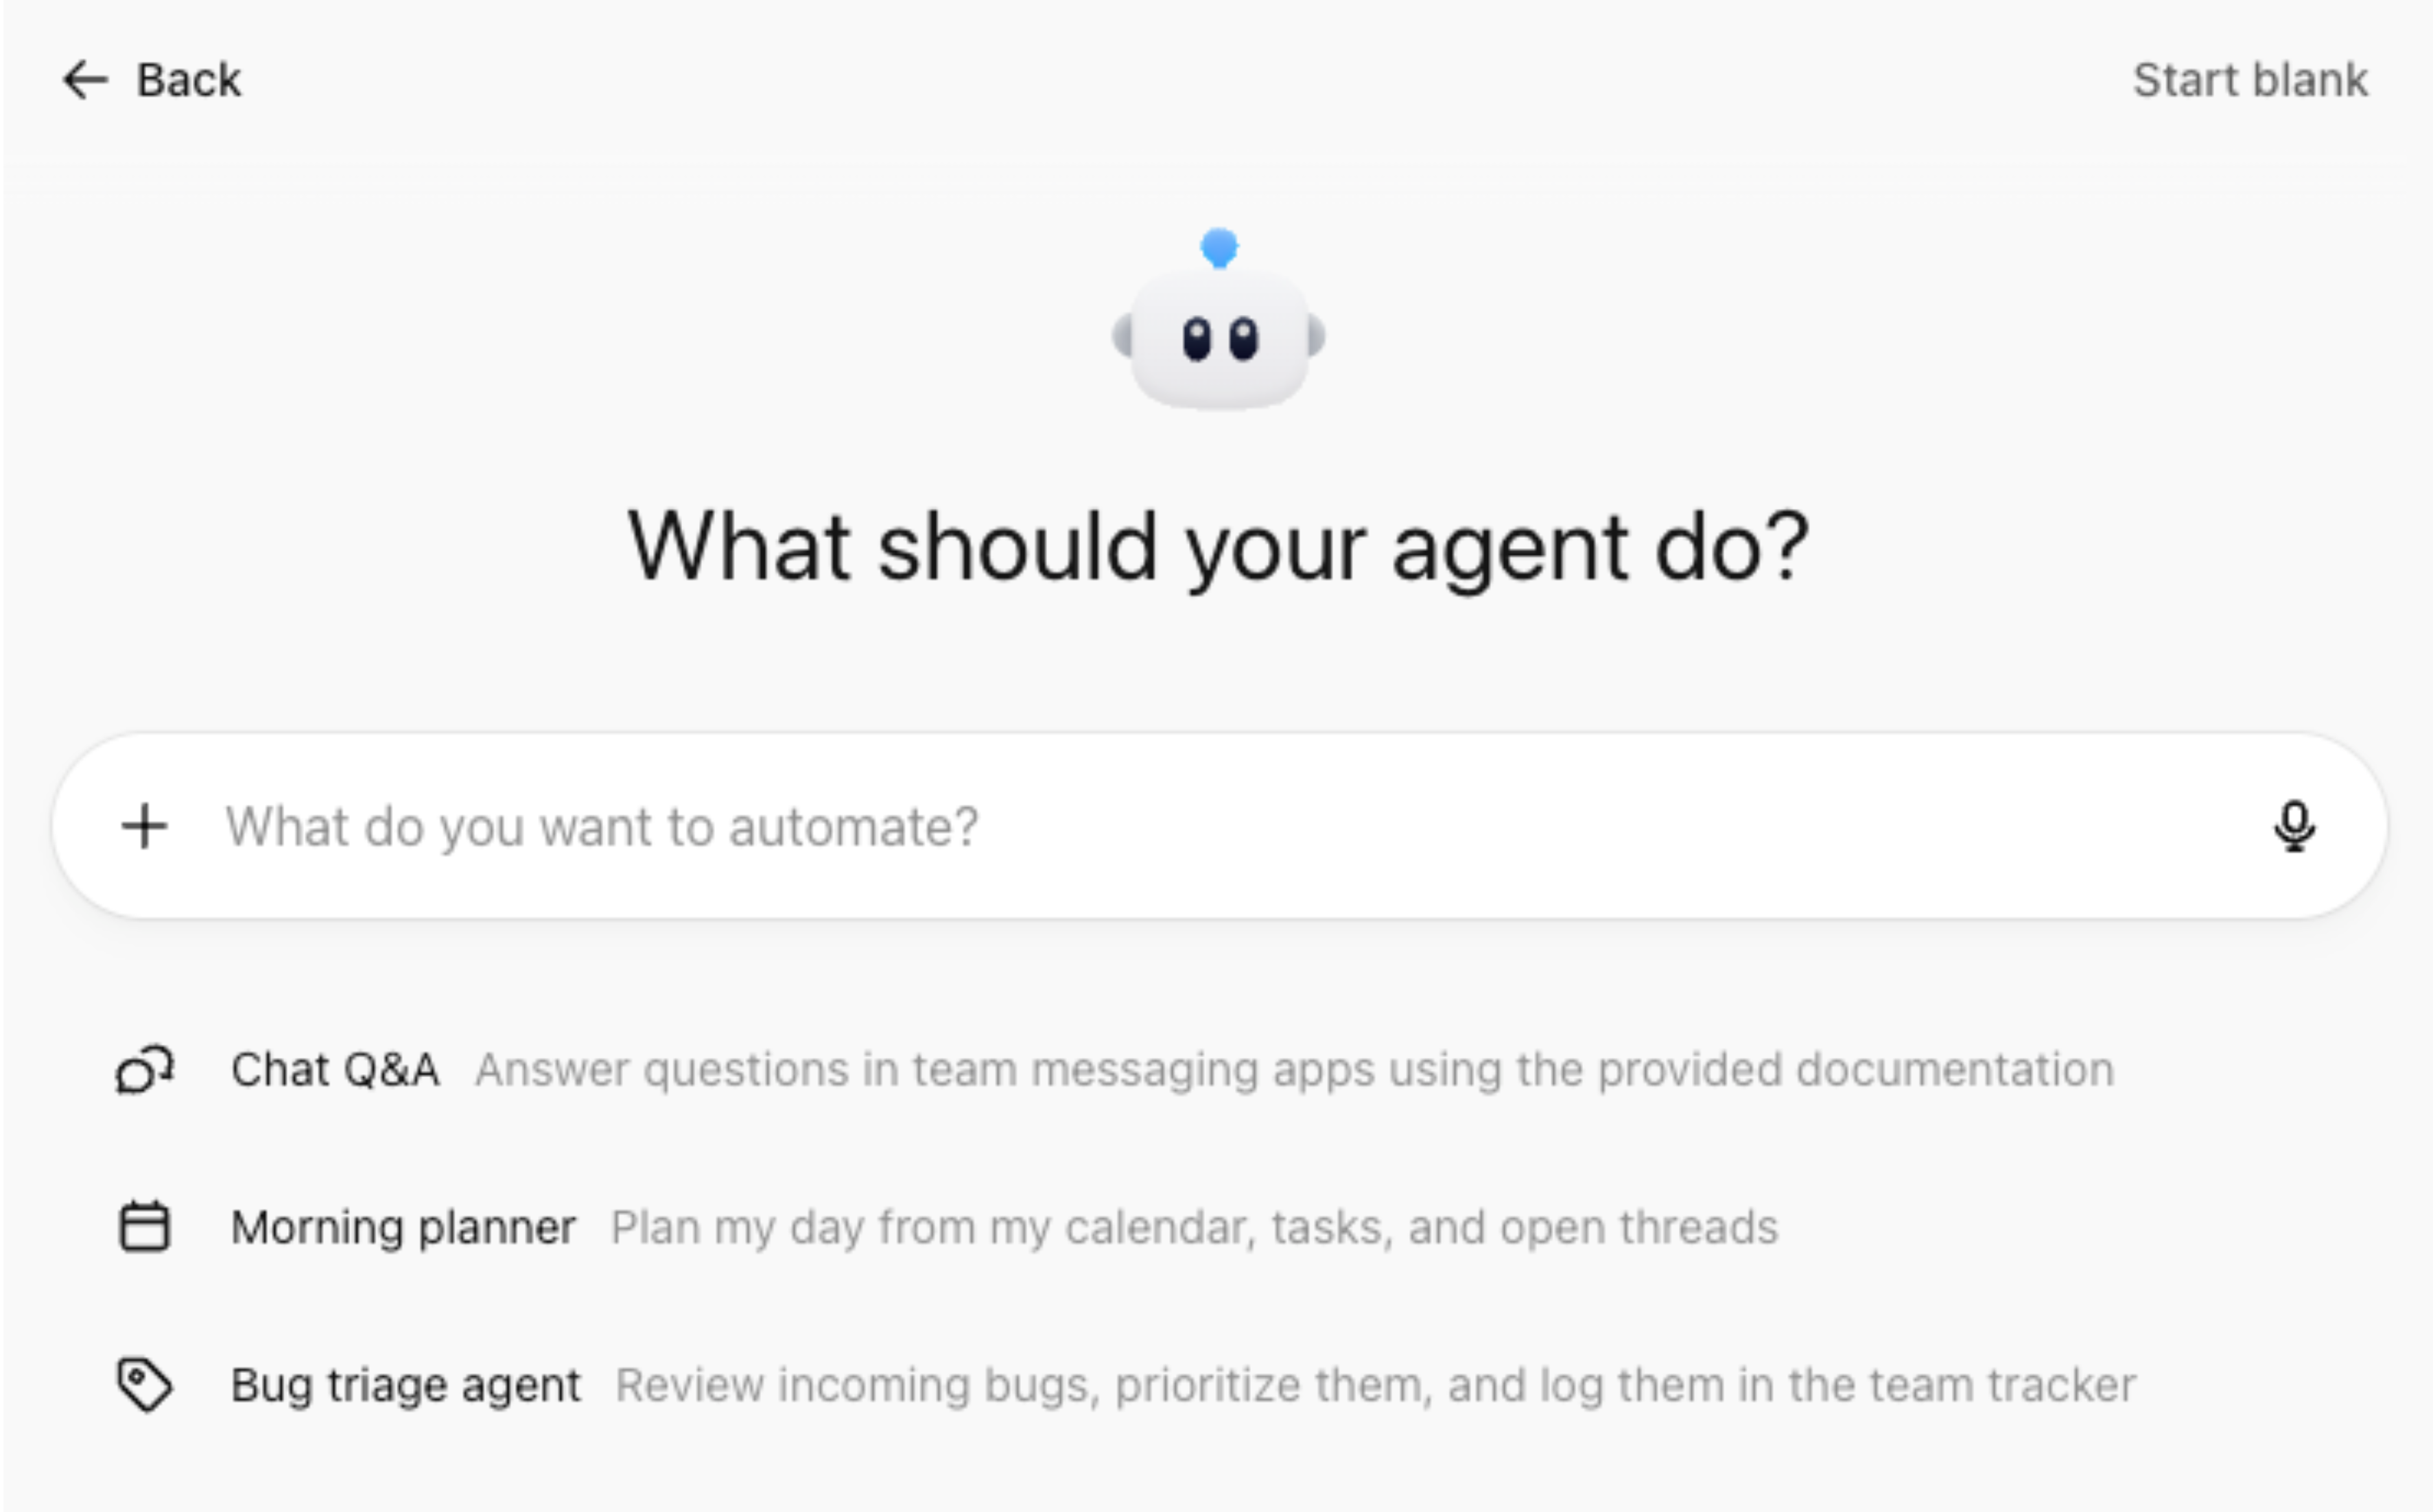
Review the draft plan.
Make any changes you want.
Select Build this agent.
In the agent builder, refine the agent as needed.
Select Create on the top-right of the page.
Preview an agent
You can preview an agent in the agent builder before creating it.
To preview an agent:
Select Preview on the top-right of the agent builder.
Test the agent with a sample prompt.
Review the output.
Make any changes you want.
Select Create when you are ready.
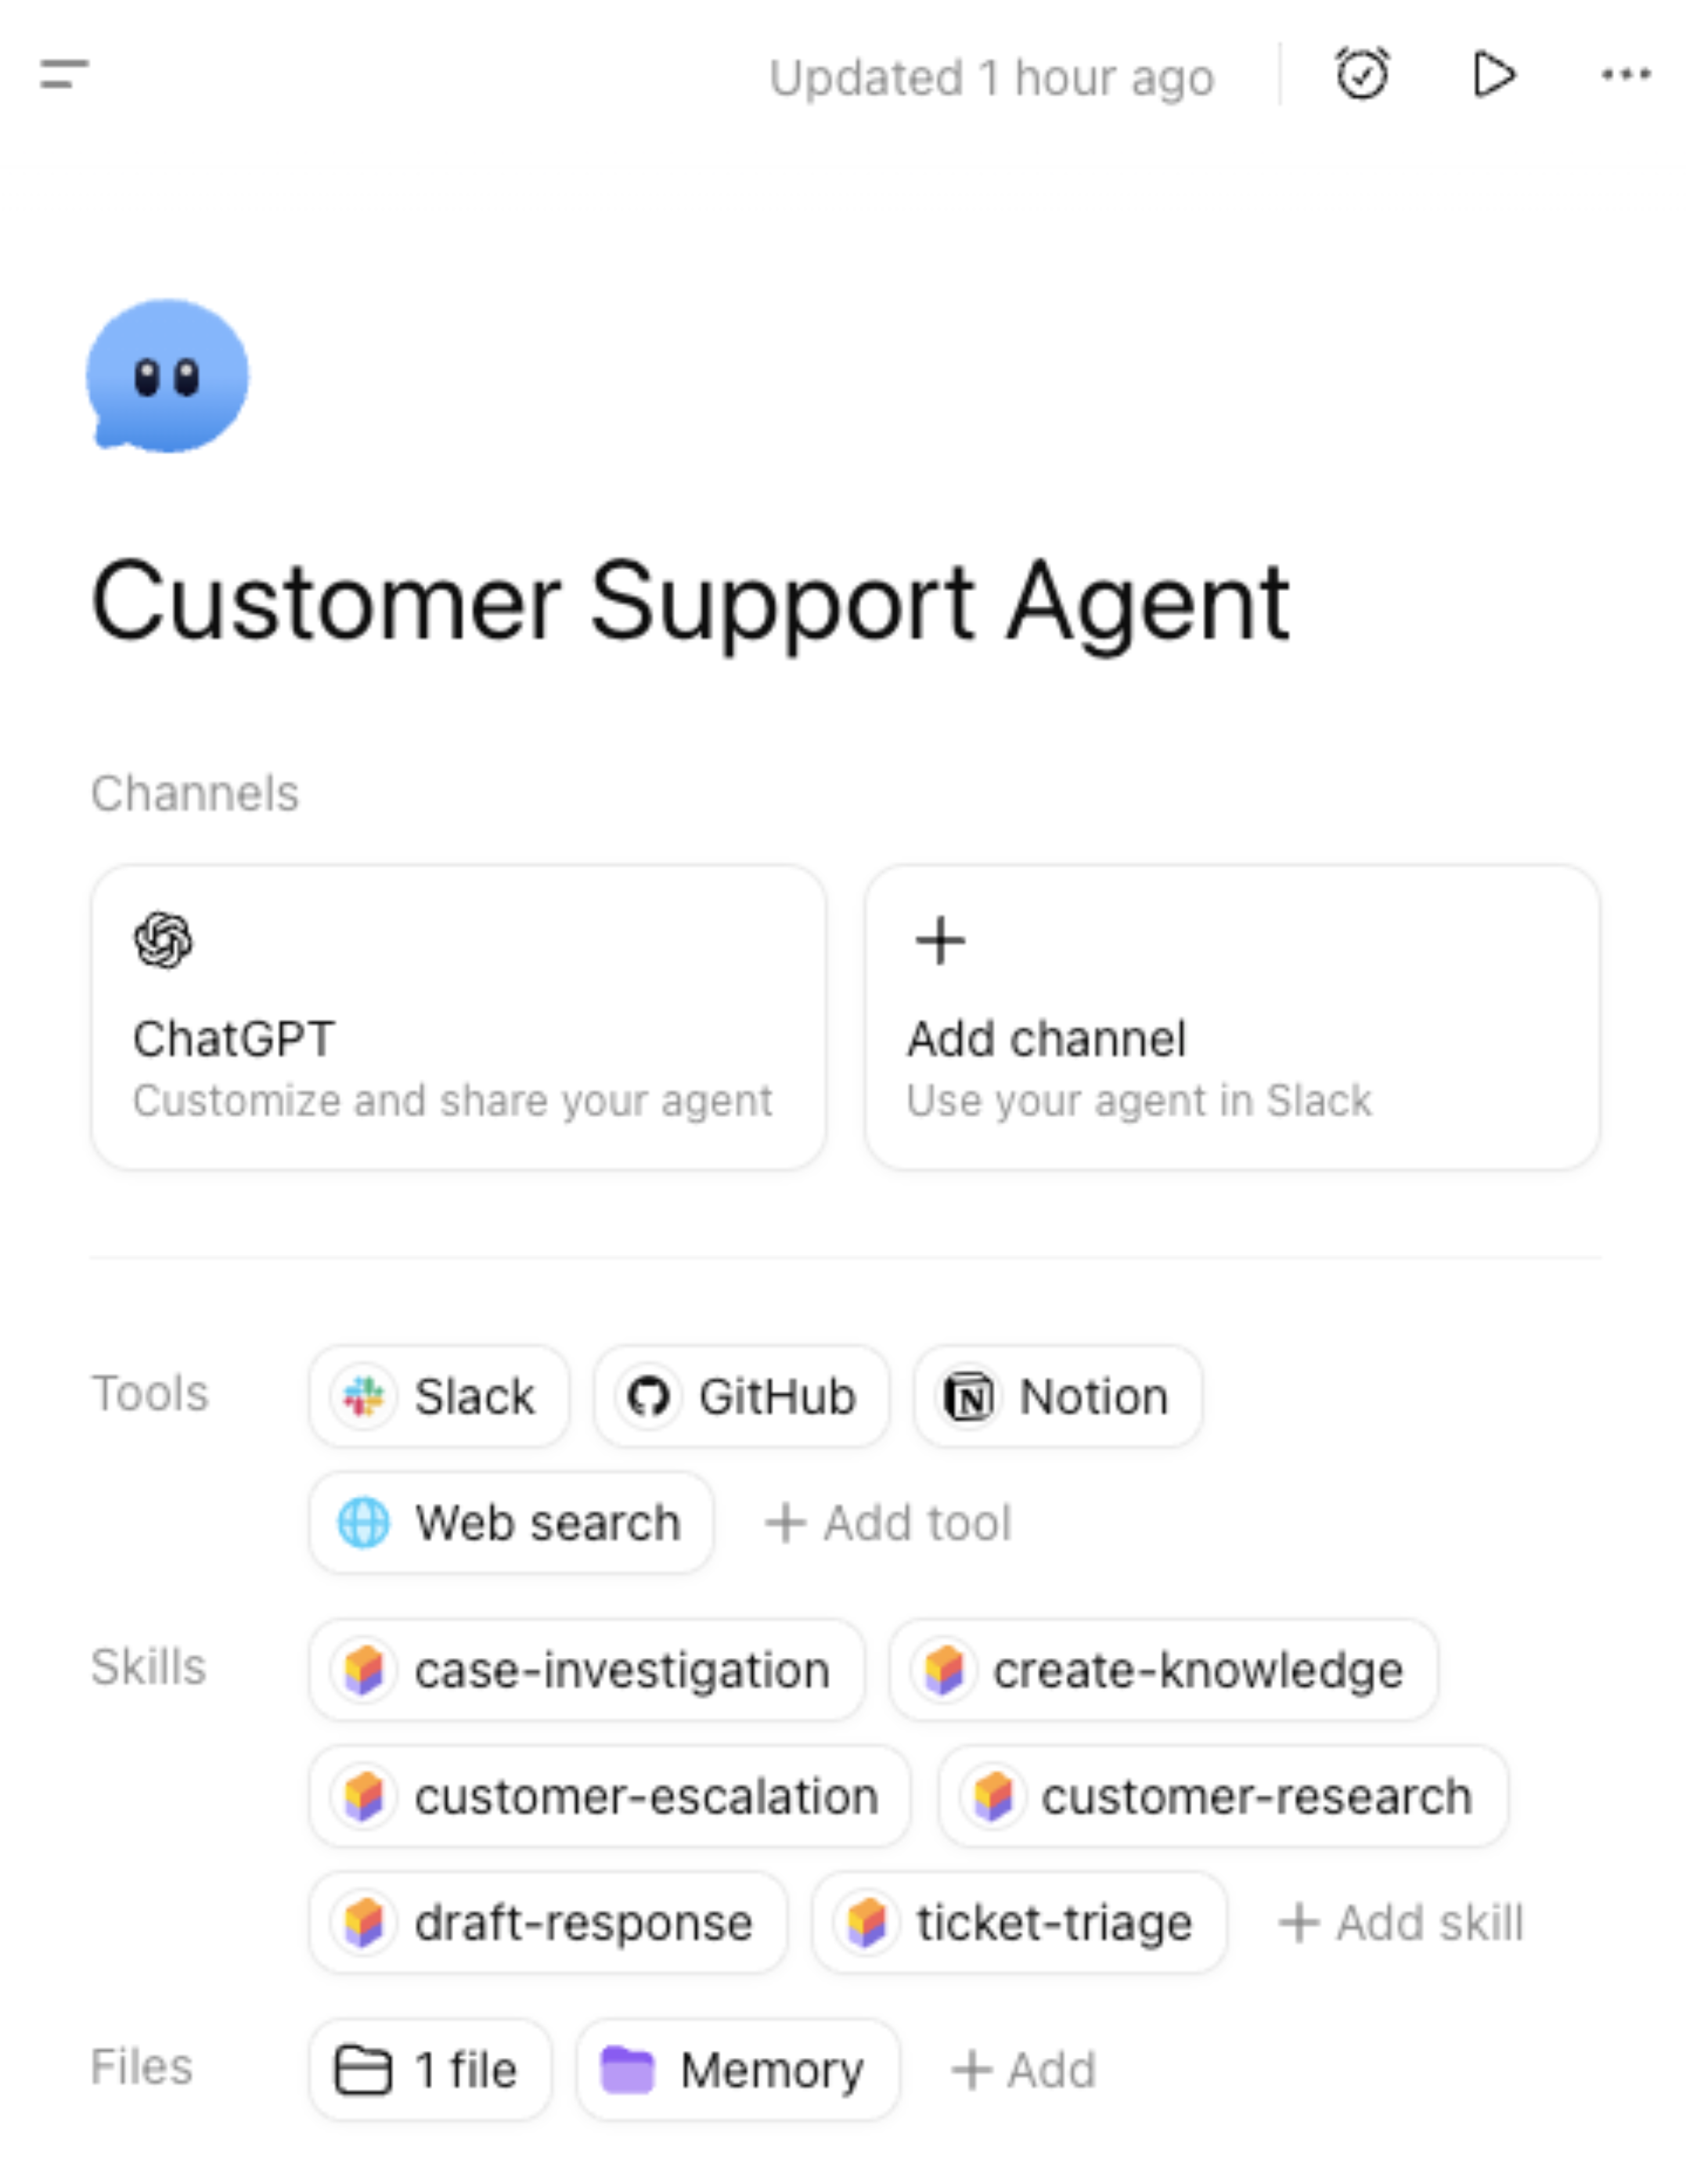
Add tools, apps, skills, and channels
You can add tools, apps, custom MCPs, skills, and files in the agent builder.
If your agent is live, select Update on the top-right of the agent builder page to save any changes you’ve made to your agent.
Manage the ChatGPT channel
Under Channels, select ChatGPT to manage how your agent appears in ChatGPT and who can access it.
Manage access
You can set who can access this agent in ChatGPT:
Private to me
Anyone at [organization] with the link
Publish to [organization] directory
Set up an agent schedule
On the ChatGPT channel page, select Add schedule.
Choose the channel.
Choose the schedule type and frequency (run every).
Add any additional instructions.
Select Add schedule.
Customize appearance
You can add a short description, add starter prompts, and preview how the agent will appear in ChatGPT.
Connect your agent to Slack
You can also select Add channel to connect a Slack workspace and add this agent to a channel. Your Slack admin may need to approve access first.
Trigger an agent with the API
Workspace agents help teams turn repeatable work into shared agents that move workflows forward across your tools. With API triggers, you can programmatically start an agent from an internal workflow, scheduled job, support tool, or other system—using the same reusable instructions and connected context every time.
For example, teams can automate meeting follow-ups, process and route vendor, procurement, and approval requests, and qualify and engage inbound leads.
To set up an API trigger:
Add an API channel in the workspace agent builder.
Create a Workspace Agent access token in ChatGPT Admin > Access token and select the Workspace Agents scope.
Follow the in-product instructions and example requests. For detailed API setup and request examples, see Trigger workspace agent runs.
Workspace Agent access tokens are scoped to Workspace Agents API operations only.
Please note that the API queues the agent run and returns 202 Accepted with no response body. It does not return a run ID, and the agent’s response cannot currently be retrieved through the API.
Learn how to authenticate with Workspace Agent access tokens.
Add tools and apps
From the Tools section, you can select + Add tool to add:
apps, such as Google Calendar, Google Drive, Slack, and SharePoint
your own custom MCPs
additional tools, such as image generation and web search
Available apps depend on what is enabled in your ChatGPT workspace. For some apps, you may be required to connect to that app.
Choose an authentication type
For each app connection, you can choose how the agent authenticates.
End-user account - each person running the agent authenticates with their own account.
Agent-owned account - the agent uses a shared connection, so people running the agent do not need to authenticate during the run.
If you use an agent-owned account, use a service account when possible. Do not use a personal account unless you understand the risks. We recommend limiting access to only what the agent needs.
Manage write actions
⚠️ Note: Always ensure you are using write action safety for risky workflows or avoiding unintended data exfil scenarios for your agents.
By default, write actions for apps and connectors are set to Always ask during an agent run.
Depending on the app, you may also be able to:
set write actions to Never ask
use a Custom approval setting for specific write actions
Use write approvals carefully for workflows that can send, edit, post, or delete content.
Connector Action Constraints
Connector Action Constraints let agent builders limit what an app or connector can do when an agent uses it. These constraints add an extra layer of control beyond write action approvals by restricting how specific connector actions may be used.
Connector Action Constraints govern what the agent can ask a connector to do. They do not filter or restrict the data a connector returns in response. For example, a builder could block an agent from searching email for the term “confidential,” but the constraint would not prevent the connector from returning an email that contains that term through an otherwise permitted action.
For example, a builder can create a constraint that:
Only allows an email action to send messages to recipients at a specific domain, such as openai.com
Only allows an agent to read from a specific Google Doc
Limits other supported connector actions to the conditions defined for that agent
To add a Connector Action Constraint, describe the restriction you want in the conversational agent builder. The builder will generate a rule for you to review before it is added to the agent.
You can also create a rule from the connector settings:
Open the agent in the builder.
Go to the connected app or connector.
In the Safety section, select Add constraint.
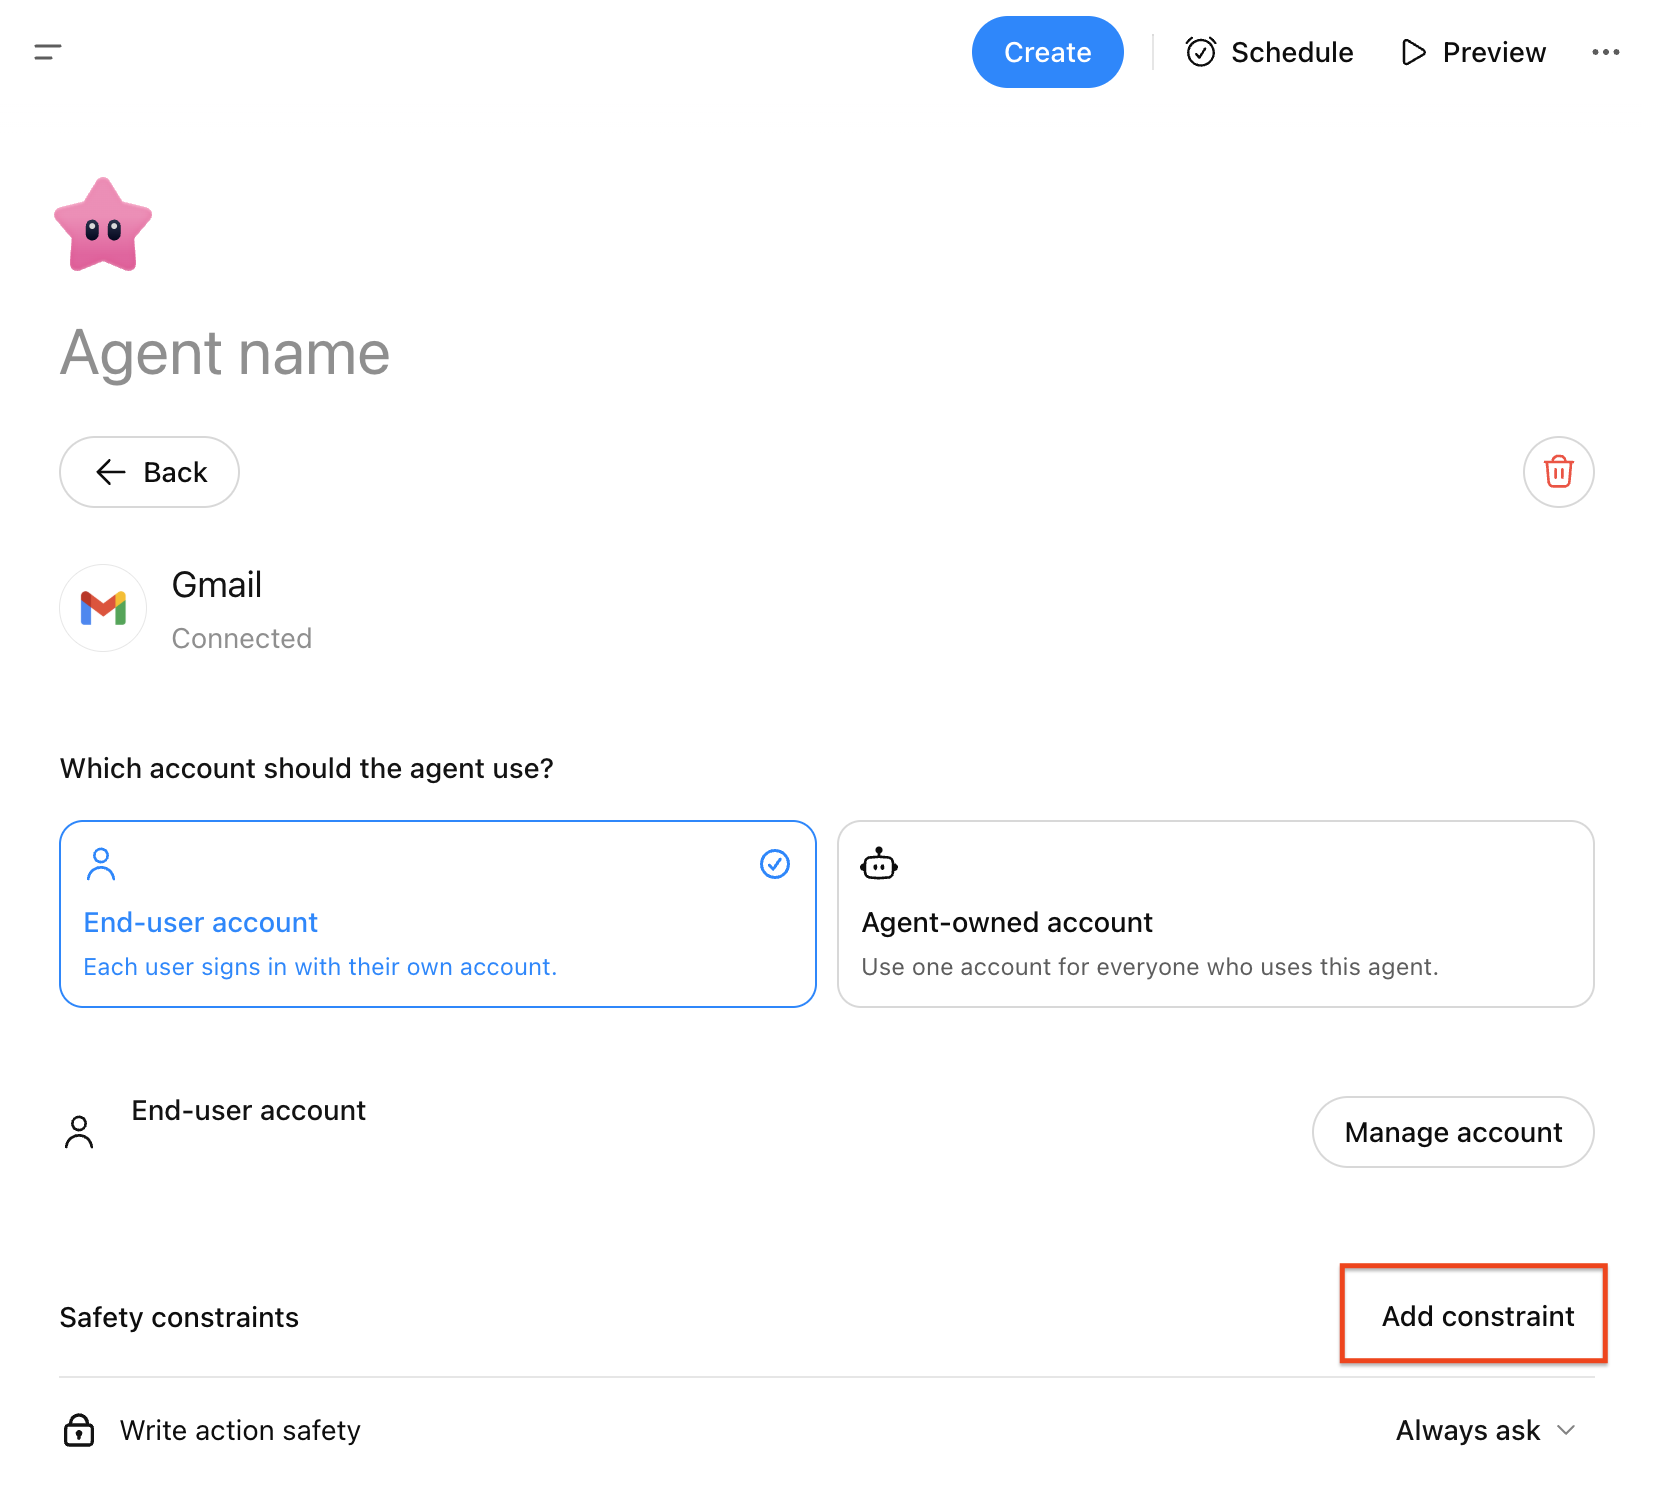
Describe the restriction in natural language.
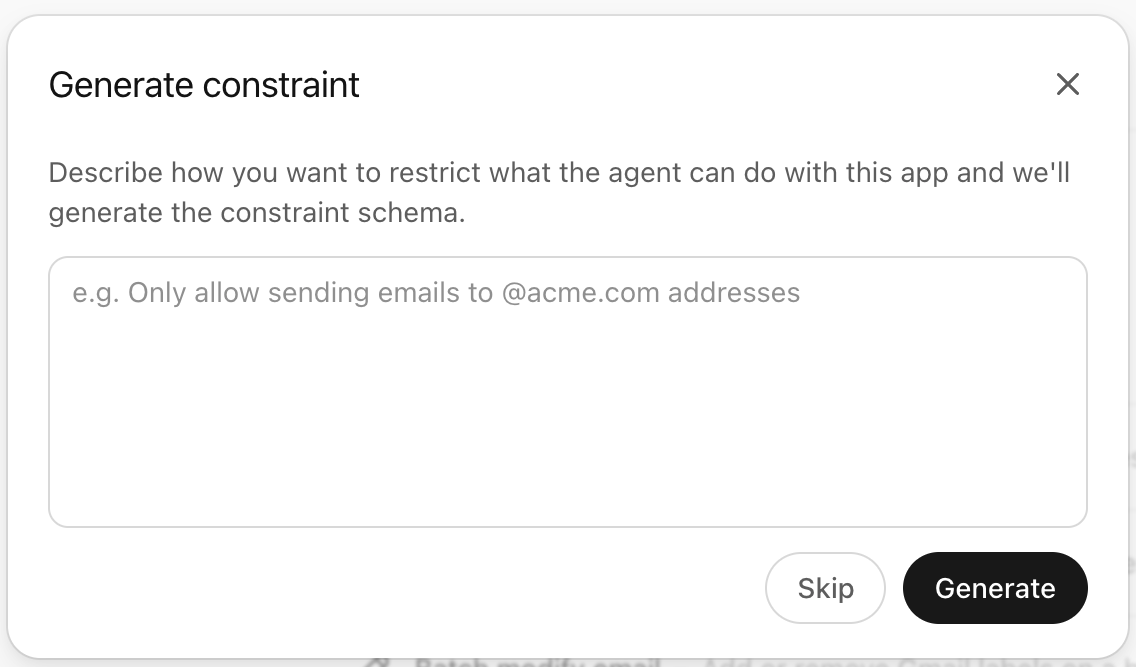
Select Generate to create the rule.
Review the generated rule, then select Update to save the change to the agent.
Connector Action Constraints are configured by agent builders for supported apps and connectors. They are useful when an agent needs access to a connector, but that access should be narrowed to a specific, intended use.
Add skills
You can add a skill by:
creating a new skill
uploading a skill file
selecting from skills already available to you
Skills can help an agent follow a defined process or use specialized instructions.
Add files and memory
You can add a File by clicking on the + Add in the Files section.
Manage your agent
If you created an agent, you have additional controls in the more options menu (•••) on the agent definition page.
Collaborate on workspace agents with multiplayer editing
Workspace agents can now be maintained by multiple teammates. The agent owner can invite members of the same workspace and give each person permission to chat with or edit the agent.
Access levels
| Access | What it allows |
|---|---|
| Can chat | Chat with the agent and view its configuration, including instructions and tools. |
| Can edit | Everything in Can chat, plus editing the shared draft and publishing new versions. |
| Owner | Full editing access, permission management, workspace distribution controls, and deletion. |
“Can edit” is granted to individual workspace members. Sharing an agent by workspace link or listing it in the workspace directory does not automatically make everyone an editor.
Give someone edit access
You must create the agent before you can share it. Sharing controls are not available for a new, uncreated draft.
Open the agent in the workspace agent builder.
Select Share.
Search for one or more teammates.
Choose Can edit.
Select Send invite.
You can only invite active members of the workspace that owns the agent. If you cannot search for teammates, your role may not include permission to view workspace members.
What editors can change
Editors work from the same shared agent draft. Depending on the agent’s configuration and the tools available in the builder, they can:
Edit the agent’s name, description, instructions, and other details.
Add or change conversation starters.
Add, edit, rename, copy, or remove agent files.
Work with uploaded Builder skills.
Configure supported apps and connectors.
Preview and test the agent.
Save draft changes and publish new versions.
Invite teammates with Can chat access or remove chat-only access.
Some dependencies remain associated with the agent owner. For example, collaborators may only attach certain connector accounts or shared skills that belong to the owner.
What remains owner-only
Editors cannot:
Give another person Can edit access.
Change or remove another editor’s access.
Change workspace-wide access or directory visibility.
Transfer ownership or remove the owner.
Delete the agent.
Manage owner-only configuration such as channel setup, shared ChatGPT skills, or custom MCP setup.
Additional restrictions apply to agents deployed to Slack. While an active Slack channel deployment exists, only the owner can add or update the agent’s apps and connectors.
Editing at the same time
Multiplayer editing uses a shared draft, but it does not merge simultaneous changes in real time.
If another person saves changes before your changes are saved, you will see a Save conflict message. Select Refresh agent to load the latest saved version before continuing. Refreshing replaces your local draft with the latest version, so copy any unsaved work you want to keep before refreshing.
To reduce conflicts, coordinate with other editors when making substantial changes to the same agent.
Change or remove access
The owner can return to Share at any time to:
Change an editor to Can chat.
Change a chat-only user to Can edit.
Remove a teammate from the agent.
After edit access is removed, that person can no longer save changes to the shared draft.
Version history
You can review earlier versions of an agent, preview a previous version, and republish an earlier version.
Share workspace agents with groups
Workspace agent owners can share an agent with an entire workspace group instead of adding members individually. Access follows group membership, making it easier to collaborate with teams such as Support, Reviewers, or Agent Editors.
Before you begin
Group sharing is available in eligible managed workspaces where Groups are enabled.
The following requirements apply:
The agent must be owned by a workspace account.
The agent must be created before it can be shared.
The group must belong to the same workspace as the agent.
You must be the agent owner and have permission to search workspace members and groups.
Personal agents cannot be shared with workspace groups.
Share an agent with a group
Open the agent in the workspace agent builder.
Select Share.
Search for the group by name. Groups appear alongside people in the search results and include their member count.
Select the group.
Choose an access level.
Select Send invite.
You can add multiple people and groups in the same invitation.
Group access levels
| Access | What group members can do |
|---|---|
| Can chat | Chat with the agent and view its configuration, including its instructions and tools. |
| Can edit | Chat with the agent, update its shared draft, and publish new versions. |
Group members with Can edit can update instructions, agent details, conversation starters, files, Builder skills, and supported apps or connectors. Owner-only controls—including sharing, workspace distribution, deletion, channel setup, and certain connected resources—remain unavailable to editors.
How group membership affects access
Access is based on each person’s current group membership:
New group members receive the group’s agent access.
Members who leave or are removed from the group lose access granted through that group.
You do not need to update the agent every time the group’s membership changes.
Workspace administrators manage group membership separately from the agent’s sharing controls.
If someone receives access from more than one source—for example, an individual invitation and two workspace groups—their highest access level applies. Removing one group’s access does not remove access they receive individually, from another group, or through workspace-wide sharing.
Change or remove group access
The agent owner can return to Share to:
Change a group between Can chat and Can edit.
Remove the group from the agent.
Review the groups and individual teammates that currently have access.
Removing an editor group prevents members from making further changes unless they still have edit access through another group or individual permission.
Editing at the same time
Group editors work from the same shared draft as the owner and other editors. Changes are autosaved, but simultaneous edits are not merged in real time.
If someone else saves first, you may see a Save conflict message. Copy any local work you want to keep, then select Refresh agent to load the latest saved version before continuing.
Agent analytics
The Agent Analytics page shows how many unique users have invoked the agent and how many runs it has had over time.
Change Slack workspace
If you change the Slack workspace for an agent, previously configured Slack channels for that agent are removed, and the Slack bot connection is reset.
You need to reconnect Slack before Slack triggers can work again.
Duplicate an agent
Duplicating creates a draft copy of an agent so you can create a variation for a different task.
You can find duplicated agents in Agents under Built by me.
Delete an agent
Deleting an agent permanently removes it. This action cannot be undone.
Update and run your agents
Every agent automatically includes a ChatGPT entry point accessible from the left-hand sidebar.
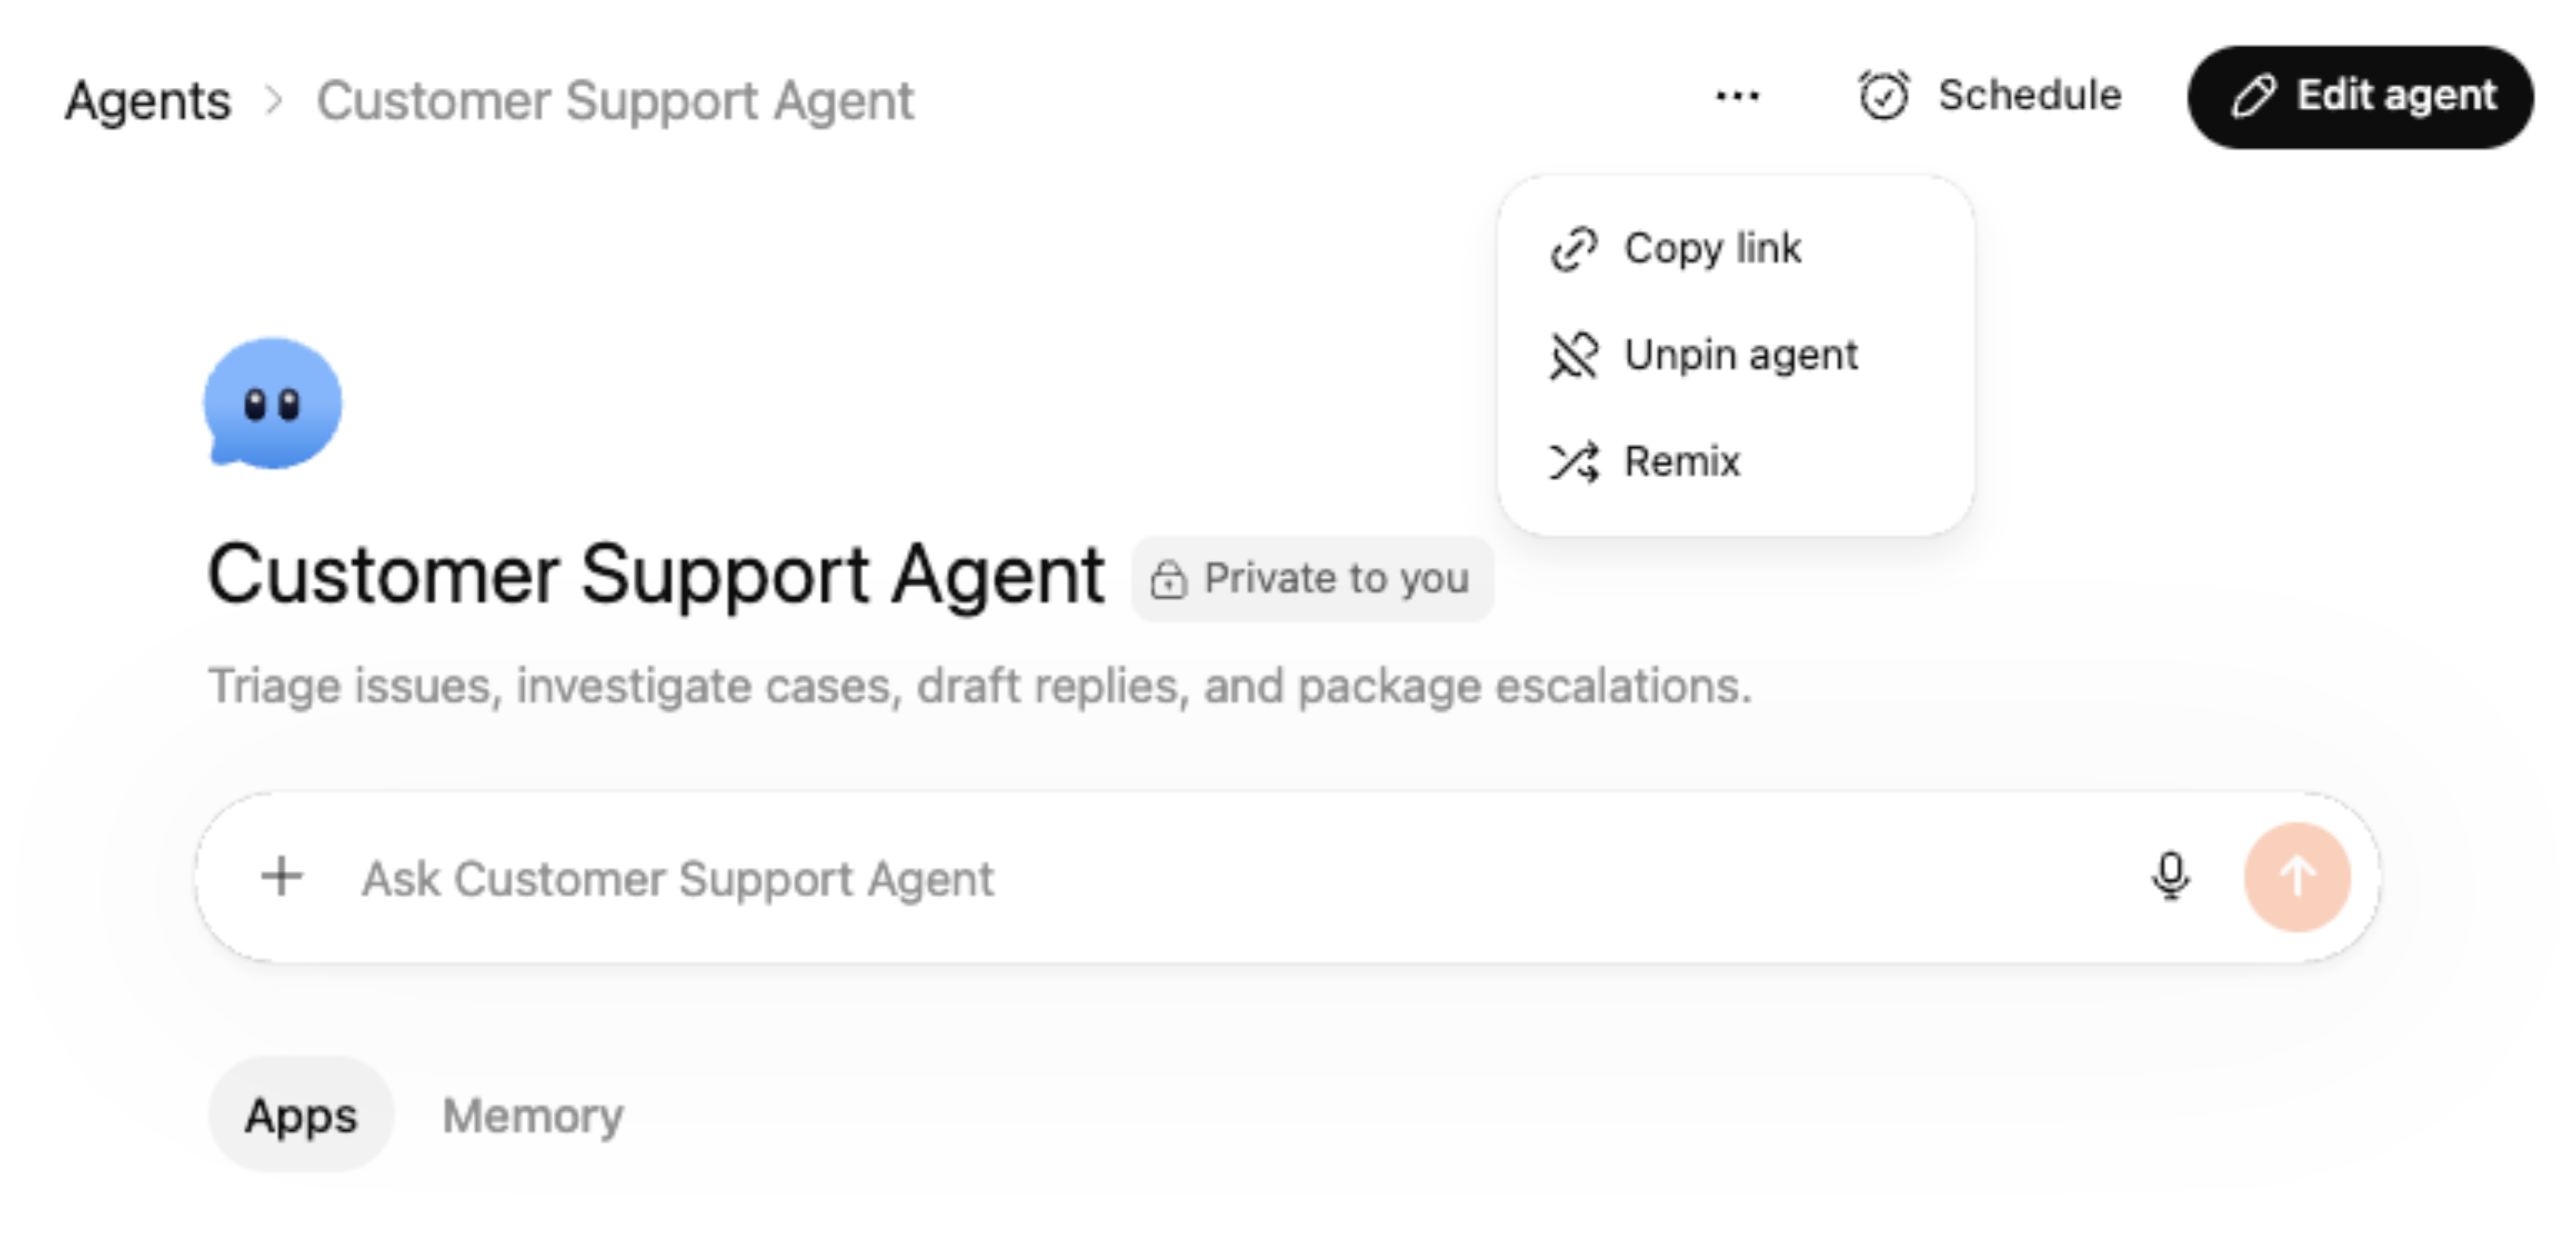
You can edit your ChatGPT workspace agents by clicking on the agent in the left-hand sidebar in ChatGPT, and clicking on Edit agent on the top-right of the agent page.
You can set or update a schedule by selecting Schedule on the top-right of the page:
Choose the channel.
Choose the schedule type and frequency (run every).
Add any additional instructions.
Select Add schedule to complete the update.
Select the more options menu (•••) to copy a link to your agent to share it with your organization, unpin it from the sidebar, or duplicate it.
Run an agent in ChatGPT
You can run an agent in ChatGPT in either of these ways:
type @ and the agent name in a regular ChatGPT conversation
open the agent from Agents and enter your prompt there
Starter prompts may also appear on the agent page to help people get started.
Use an agent in Slack
⚠️ Note: For connecting your agent to Slack, all your agent’s apps need to be set up using shared auth connections. If you are using your personal account for setting up these shared auth connections, we recommend understanding risks of actions other users will be able to perform on your behalf, and reduce your risks by limiting to a trusted Slack channel containing your company employees only, limiting actions that your app connection can do etc.
You can connect an agent to Slack so people can use it in a channel.
Add the Slack app to a channel
Before you connect an agent to Slack, add the ChatGPT Agents app to the Slack channel:
Open the Slack channel.
Open the channel settings.
Open the Integrations tab.
Select Add apps.
Search for the ChatGPT Agents app and add it to the channel.
Connect a Slack channel to an agent
To connect a Slack channel to an agent:
Open the agent.
In Channels, add a new channel.
Select Connect Slack.
Choose the Slack workspace you want to connect.
Create a Slack handle for the agent.
Choose the Slack channel the agent should operate in.
Save your changes.
Use shared connections for Slack
⚠️ Note: Always ensure you are setting up agent-owned account connection using a service account. Using your personal account to set up this connection & making the agent available to others can inadvertently allow access to your app’s data to users who invoke the agent. We recommend scoping down access to only what is required for the agent to perform its job to limit inadvertent data exposure/ exfiltration risks.
To use an agent in Slack, all app connections for that agent must use shared authentication.
If the agent is using personal connections, you need to switch those connections before the agent can work in Slack.
If you use your own account for a shared connection, review the risks carefully. Other people may be able to trigger actions through that connection when they use the agent in Slack.
Choose how the agent responds in Slack
For a connected Slack channel, you can choose whether the agent:
responds to every message in the channel
responds only when someone mentions its Slack handle
You can also add channel instructions to control how the agent behaves in Slack.
Run an agent from Slack
To run an agent from Slack:
Make sure the ChatGPT Agents app is added to the channel.
Open the connected Slack channel.
Mention the agent’s Slack handle, if the channel is set to mention-only replies.
Enter your request.
Workspace admin controls
Workspace admins can control how ChatGPT workspace agents are used in Business and Enterprise workspaces.
For more information about workspace agent security, compliance, governance, and admin controls, see the Workspace Agents Security Overview.
Role-based access controls
⚠️ Note: Enabling RBAC for agent publishing with personal connections lets creators publish agents that use their own app or connector credentials. Anyone who can use the agent may be able to access data or perform actions through those connections as the creator. Only enable this for users who understand the risk. Use least privilege, limit the audience, avoid sensitive or high-impact connectors, and audit agent configurations regularly.
You can update the following role-based controls:
Enable agents, which lets members browse and run agents
Enable agent building, which lets members create, edit, and duplicate agents
Enable agent publishing, which lets members publish agents to the workspace directory
Enable agent publishing with agent-owned connections, which lets members publish agents that use personal or shared authenticated connections
Use publishing with personal connections carefully. It can allow other people to use an agent that authenticates with the builder’s account.
Enable the Slack bot for ChatGPT Agents
To enable Slack use for agents:
Open Workspace Settings.
Go to Apps > Directory.
Find Slack bot for ChatGPT Agents.
Enable it for the roles that need access.
Allow builders to create Slack handles
To create a Slack handle for an agent, builders may need permission to create, edit, and deactivate user groups in Slack.
A Slack admin may need to grant those permissions before builders can finish Slack setup.